Getting Rusted – Part-2

In this post  I’ve show you how to create your first rust language project using Cargo ,

I think you have already installed and configured rust language in your computer according to my previous post Install Rust on your machine.

So first move to your preferred directory to create a project and issue the following command.

user@user-laptop:~$cargo new RustTtest

Here cargo will create the project folder within seconds 🙂 .

Screenshot at 2020-07-18 09-44-04

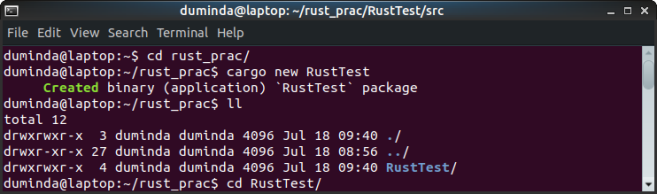
Then move to the  project directory using  following command

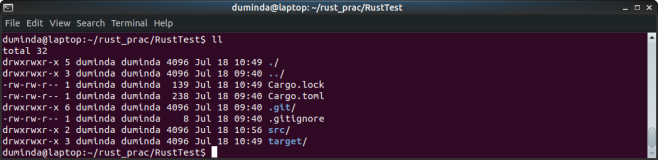
user@user-laptop:~$ cd RustTest 

After that issue the following command to view the folder structure of the rust project.

user@user-laptop:~/ RustTest$ tree 

Then we can see the following structure in the terminal window ,

Screenshot at 2020-07-18 10-10-24

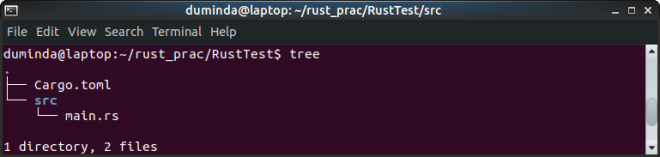
This is the simple basic structure of a rust project . Then let’s get a closer look at “Cargo.toml” . This is called a manifest or dependency descriptor file . It is like “package.json”   in npm project or “composer.json” in laravel project .

We can see the contents of “Cargo.toml” after issuing the following command .

user@user-laptop:~/ RustTest$ cat Cargo.toml 

So that file consists of the followings ,

Screenshot at 2020-07-18 10-28-39

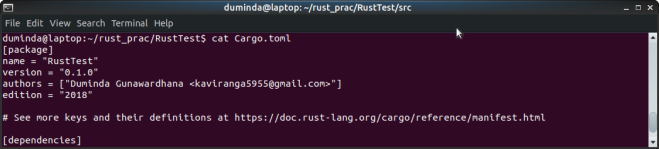
Here we can see that there is separate section(s) for package description , dependencies description . Here we can modify package name,version number , author etc , also the dependencies which need to extend the capabilities of the project.

Then we look at the src folder contents using following command ,

user@user-laptop:~/ RustTest$ cat src/main.rs 

Here we can see code as below,

fn main() {
    println!("Hello, world!");
} 

Here   “fn main ()” describes the main function of the code and function body is describes within  the curly brackets “{}”

“println!” command basically outputs string or variable data .

Then we must compile the project before run by issuing the following command

user@user-laptop:~/ RustTest$ cargo build

you can see the following compiler output in the terminal

Screenshot at 2020-07-18 10-53-58

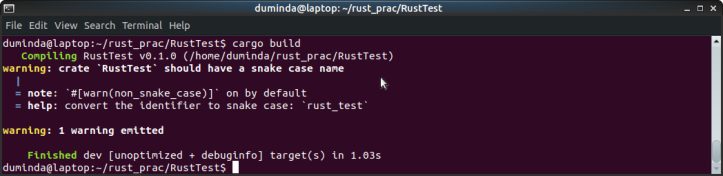
After build the project if you look at the project directory we can see that there is newly created directories and files . The compiled project is at the “/target/debug” directory.

Screenshot at 2020-07-18 10-58-54

Here we can run the compiled binary file via issuing the “cargo run” command or directly run the project using following command .

user@user-laptop:~/RustTest$ ./target/debug/RustTest

Screenshot at 2020-07-18 11-06-30

Screenshot at 2020-07-18 11-11-03

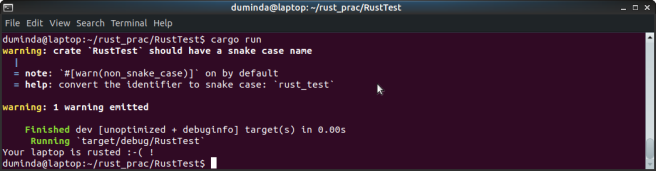
Ok 🙂 , this is how to create and compile your first rust project . Hope you’ll get the idea 🙂 .

If you have any issue please comment here 🙂 !

have a nice day 🙂 ! .

Getting Rusted – Part-2

Getting Rusted – Part-1

Ha Haa don’t get confused what I’m going to talk about 😀 . In this post I’m going to show you how to get your hands dirty with “Rust Language” 😀 .

Rust is a system programming language focused on safe concurrency. Rust is  originally designed in Mozilla Labs by Graydon Hoare . You already know about popular ” Servo Rendering Engine project” created at “Mozilla Labs ” that is capable of parallel tab processing . Inspired by that parallel processing mechanism modern ” Mozilla Firefox Quantum Browser Project ” was created that is faster than old “Gecko Rendering Engine” 🙂 based Mozilla Firefox Browser.

That is enough about that 🙂 . So let’s get to know how to setup your personal computer for  “Rust Language” . Here I’ll show you configure it on your ubuntu linux machine. The Ubuntu version that I have used here is “18.04 LTS”. and the rust version is 1.45.0 . You’ll need curl as prerequisite for the installation . If there is no curl you can install it via curl as below.

sudo apt install curl 

Then to install rust issue the following commands

curl https://sh.rustup.rs -sSf | sh

According to official documentation  following command also work like a charm

curl --proto '=https' --tlsv1.2 -sSf https://sh.rustup.rs | sh

After issuing the one of two above commands the following screen will be appeared

Screenshot at 2020-07-17 22-10-27

Here we have three options 1,2, and 3 .

1) Proceed with installation (default)

2) Customize installation

3) Cancel installation

It is better to choose 1st option to continue to the default installation  ( This will install the basic development tools 🙂 ) . I’ll describe about the 2nd option in the next post 🙂 .

After the there are two directories created in the “/home/user/” directory named “~/.rustup” and “~/.cargo” .

Here the rust language versioning and tool updates managed by rustup tool and above first directory for that purpose . The all Dev-tools are installed in the  “~/.cargo/bin”  directory.

After the installation issue the following command(s) in the terminal

rustup --version 
rustup 1.22.1 (b01adbbc3 2020-07-08) 
rustc --version 
rustc 1.45.0 (5c1f21c3b 2020-07-13)
cargo --version
cargo 1.45.0 (744bd1fbb 2020-06-15)

Here rustup is the version management tool that manages the rust versions (ex :- nightly builds,stable version etc).

Here cargo is the package manager for rust and crate host .

Ok that is the basic development installation for rust 🙂 .

Bus that is not enough 😦 . We have to define “RUSTUP_HOME” and “CARGO_HOME” environmental variables . For that issue the following command in the terminal

sudo vim ~/.bashrc

Then add the lines as below ( this step must be do carefully )

export RUSTUP_HOME=/home/user/.rustup
export CARGO_HOME=/home/user/.cargo
export PATH=$PATH:$CARGO_HOME/bin 

After that  issue the following command(s) to make the changes permanent !

source ~/.bashrc

source ~/.profile 

Then issue the following command(s)  to ensure that all the settings are Ok 🙂 .

echo $RUSTUP_HOME
/home/user/.rustup

echo $CARGO_HOME
/home/user/.cargo 

This is the basic steps of installation and  configuration of the rust language .

Have a nice day and leave a comment if you face an issue while installation of rust  language :- ) .


Getting Rusted – Part-1